Dummy-head microphones — the idea behind them is as simple as their name implies. Construct a mannequin imitation of a human head with a microphone inserted into each of its ears. This imitation should then mimic the physical properties and paths that a sound follows to our eardrums, with the left and right microphone diaphragms acting as eardrums.
The goal here is to imitate our natural hearing system, particularly the way our ears collect the spatial characteristics of any sound and its surrounding environment. The directional cues result from the variations in reflection patterns occurring at the outer ear. Those reflection patterns cause different comb- filtering effects, giving a unique signature frequency response for each direction of sound.
A dummy-head microphone is a two-channel system where the pair of recorded signals is meant to be reproduced independently to each ear, hence the term binaural. It's been called many names: artificial-head, binaural-head, dummy-head, head-and-torso-simulator (HATS), and (adopting the German term) kunstkopf microphone. A variation on this idea would have the recordist place small microphones into their own ears to capture the sound from their own unique perspective. Sennheiser used to make a model, the MKE-2002, that had the microphones mounted on a type of doctor's stethoscope and Soundman makes the OKMI and II in- ear microphones.
Some binaural-head microphones were developed for purposes other than music recording, such as medical, psychological, space and aeronautical acoustics research. A lot of engineers dismiss the idea of using these microphones for music because they are aware of the problems in playing back binaural signals through loudspeakers (more on that later), but many are realizing the special dimension a dummy-head recording can add to a more traditionally recorded mix. Tchad Blake is one notable user of binaural-head mics (see Tape Op #16).
The initial reason I set out to explore binaural recording was for my own research on its possibilities for surround-sound. Binaural-head mics don't come cheap; the most expensive of the available models can cost around $8,000. I set off trying to assemble my own from various parts and sources, not only to save a bunch of money, but to have the best quality mics as the transducers within the head. I'd heard about others making binaural-head mics, but they all used miniature lavalier type mics, which aren't as good as regular microphones as they typically suffer from erratic frequency responses and low signal-to-noise ratios. And, by investing in a matched pair of studio-quality microphones, I could have the extra advantage of using them as regular recording mics separately from the dummy-head.
The three main components of a dummy-head mic are:
- a life-size replica of a head
- a pair of life-like ear replicas (called "pinnae", or "pinna" for one)
- a matched pair of omnidirectional mics
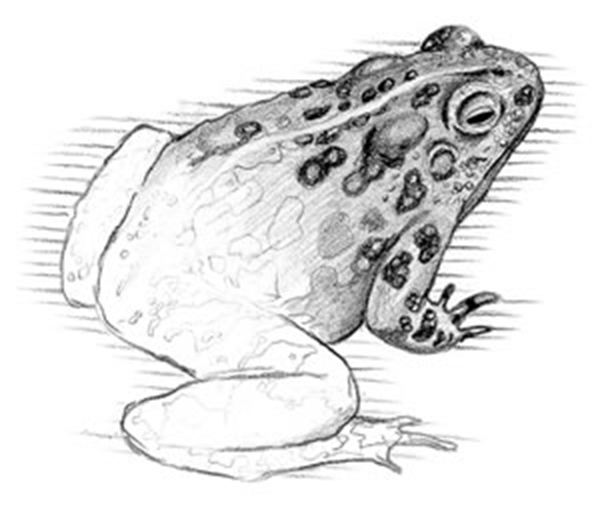
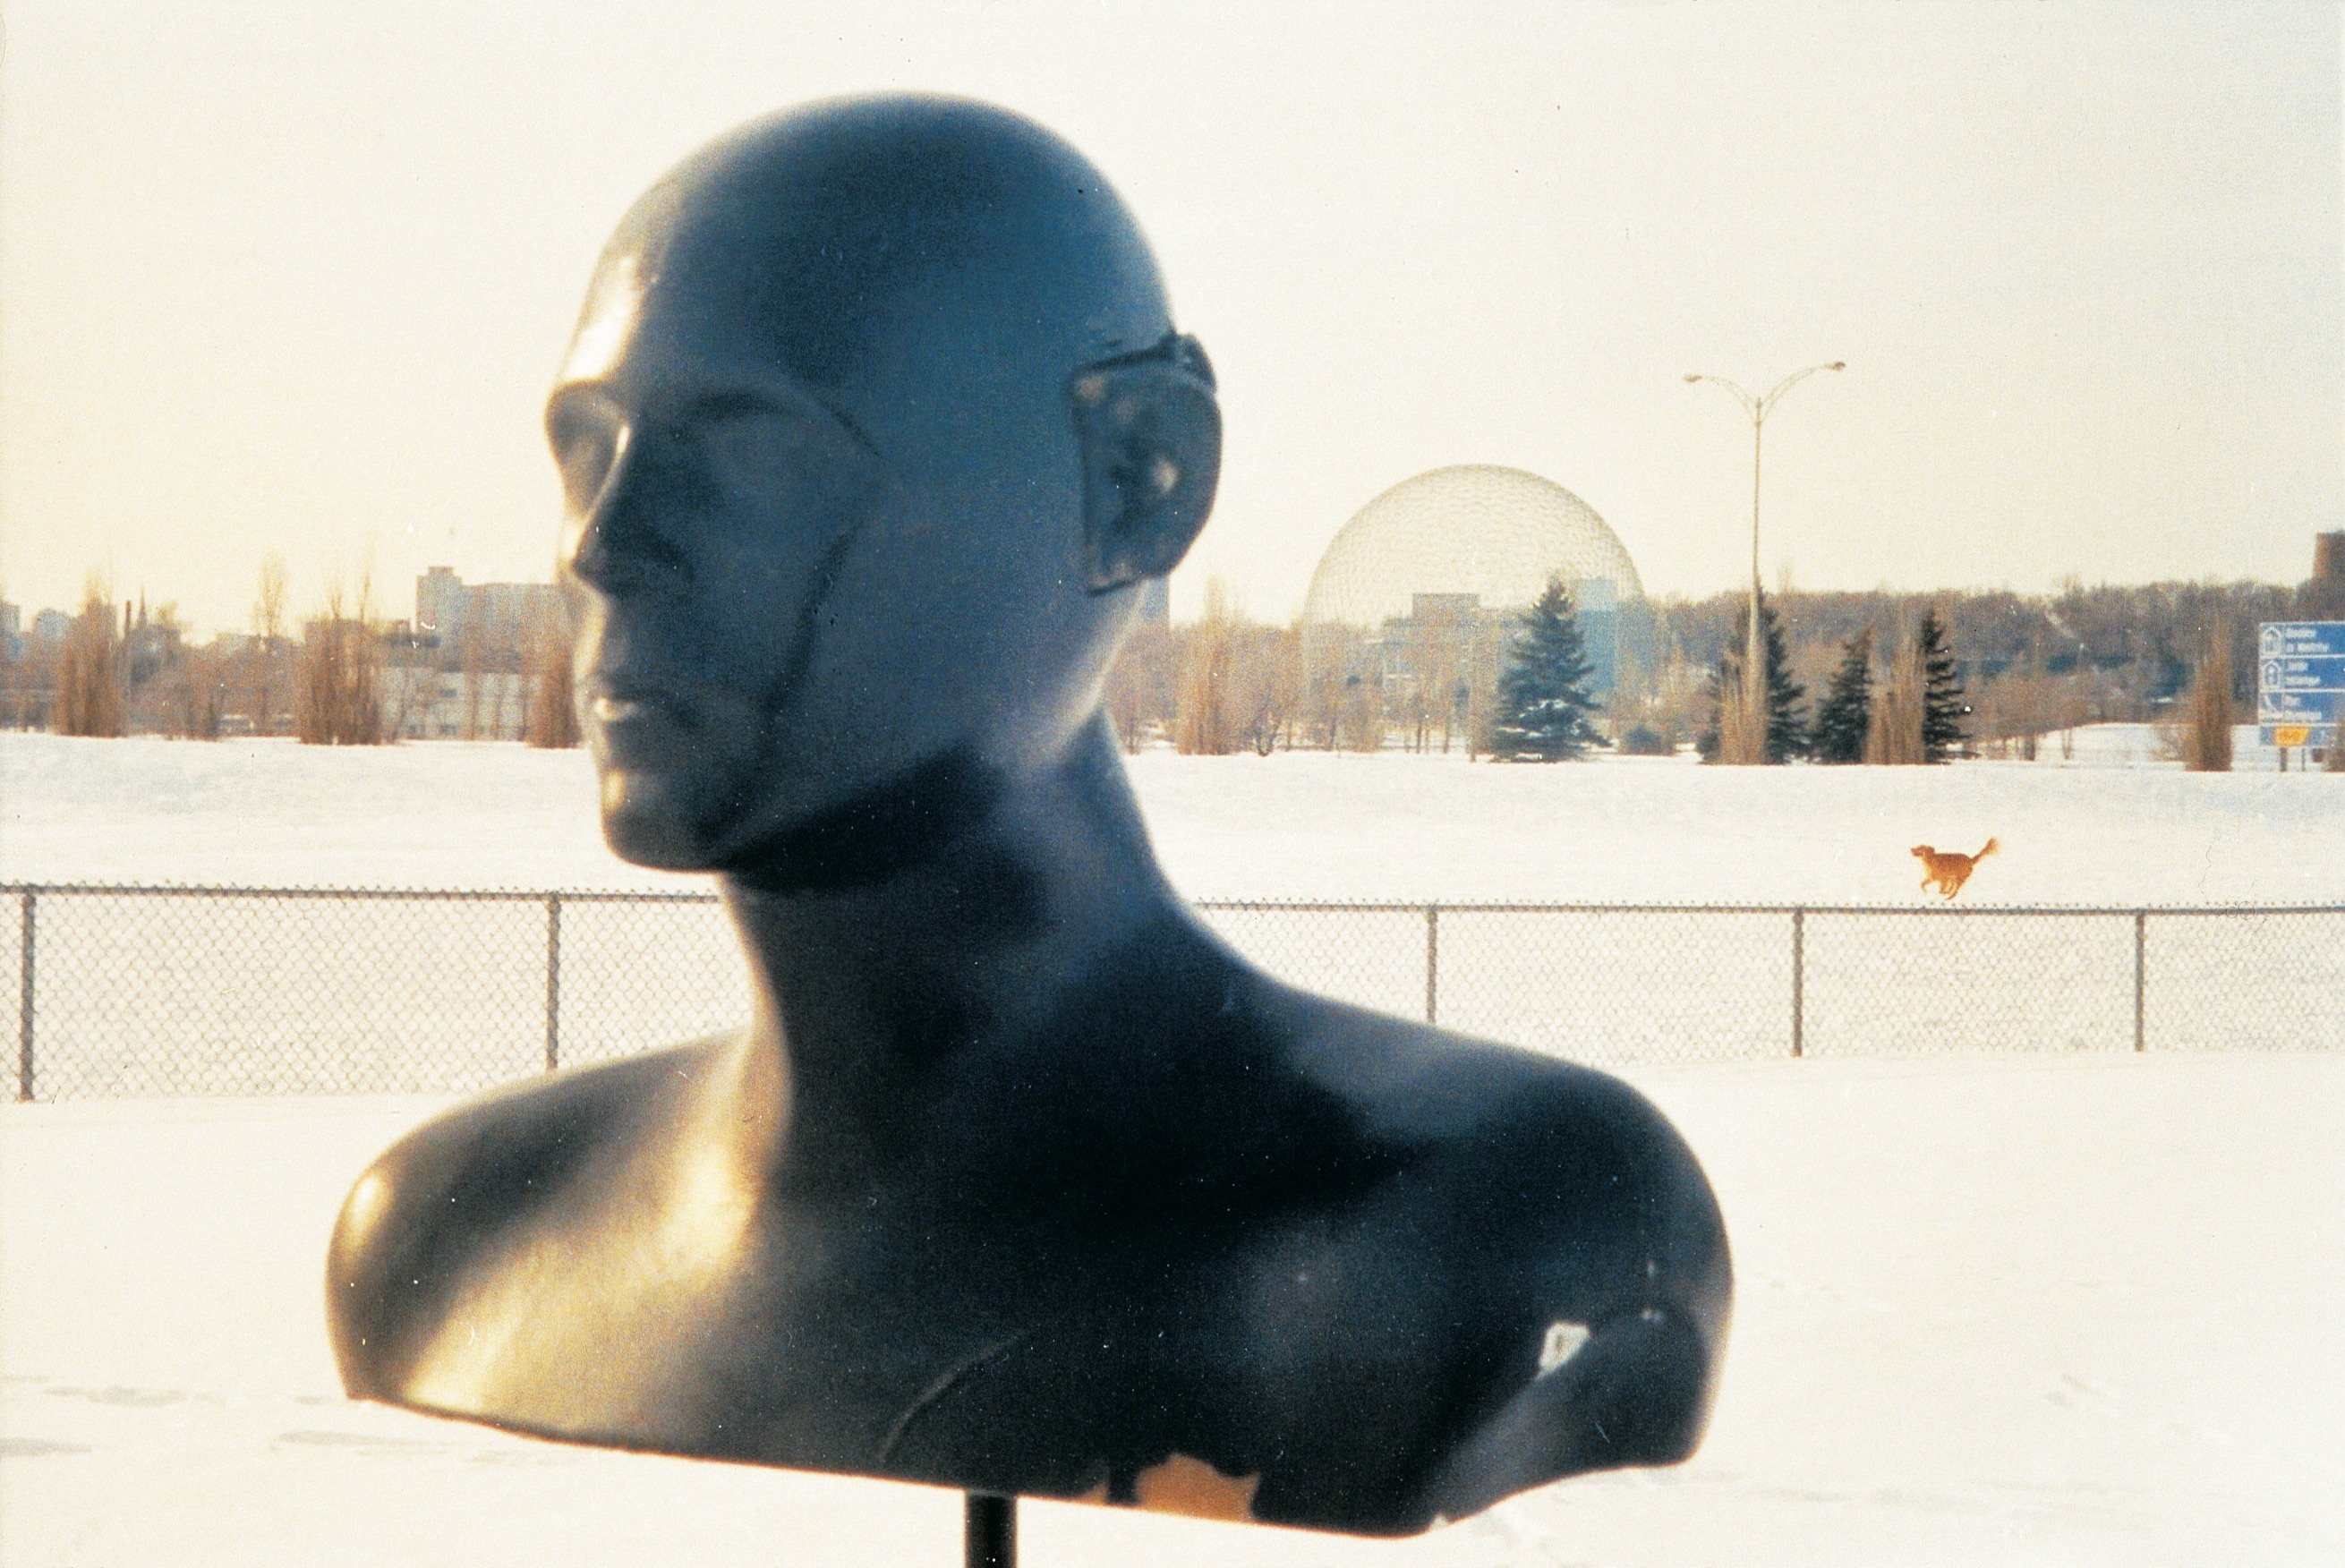
For the head, I sought to find a mannequin, preferably a bald one (as one with hair can be creepy for some). You might know someone who works in a clothing store that has access to a reasonable one. I chose to call upon a local shop that specialized in creating mannequins of various types for stores. It was called "The Mannequin Shop". Run by two brothers, it was located in the borough of Saint-Lambert just outside of Montreal. One of the brothers walked me through their mess of a workshop strewn with mannequin bodies of all sorts, looking a bit like the recalled "butcher baby" Beatles LP cover. We found one that seemed perfect. It only had to be separated from its body below the shoulders. Most commercially available dummy-head mics don't have the shoulders included, but I believe that the effect of the shoulder reflections is significant enough to include them because of the way the sound is also modified by the upper body. This chosen one (dubbed "Henry" or "Hank") was cast in hard plastic and had near enough dimensions to an average adult head with about a 7-inch width along the axis between the ears. The facial contours were somewhat smoothed out — that is, there was not too much detail — it was more an abstraction of facial features which would better translate as an averaged-out frequency-response. Uniquely detailed features (like a large nose or protruding cheekbones) might bias the frequency response too much in a particular way.
From there, I needed to hollow out the mannequin head enough so that I could insert the microphone bodies through it. The left-ear mic would pass in through the right side, and vice versa for the right ear mic. It was a pretty messy job to drill and gouge through the head like that. I mention this because it's important to thoroughly clean and vacuum out all the excess tiny debris, otherwise it will find its way sticking onto the microphone diaphragms.
Most mannequins feature some sort of stylized ear imitations. I felt this feature shouldn't be a generalized version, but a replica of typical ears, which was as authentic as possible since it is the intricate details of the pinna curves and ridges that modify the sound input from different directions. Also, the ear is placed right at the mic diaphragm, putting it at an influential position to affect the frequency and time response just before the sound falls upon the microphone. Some audiologist researcher friends helped me find a source that supplies accurate ear replicas normally intended for medical training, hearing research and clinics. A special pair of these called "soft plastic ears" (item number 2317) was ordered from Dahlberg Hearing Systems (or search the internet for "ear replicas"). They were made of a soft, malleable rubber material simulating the texture of a real outer ear. A hole was drilled through the rear block of the ear replicas in order to fit a microphone into each. The microphone was inserted through the back until the capsule was almost flush with the ear canal entrance. This is the optimal position for the collection of sound with the directional cues of the sound kept intact. Positions deeper into the ear canal should be avoided since they cause strong resonances that are not related to the direction of sound.
The microphones had to be pressure-type microphones as opposed to pressure-gradient types that have directional (cardioid, hypercardioid, figure-eight, etc.) polar patterns. Pressure type mics are naturally omnidirectional and, like our eardrums, receive sound from only one side of the "diaphragm". It is the ear and head shape that impose the directional patterns on our otherwise basically omnidirectional ears. On the other hand, pressure-gradient type mics can also be omnidirectional (mostly found in multi-pattern dual- diaphragm mics) — but the problem with these is that the sound must not be blocked from entering the sides and rear of the capsule in order to work properly. With the microphones stuffed into the fake ears, pressure-gradient omnis wouldn't work right. The best microphone I could find to suit these needs was the Sennheiser MKH-20. They have an exceptionally high signal-to-noise ratio with a sensitivity rating of 25 mV/p (or -32 dBV) and a noise specification of 10 dBA. Other mics that could also do well here are the DPA compact series mics, and pressure omnis from Josephson, Earthworks, Schoeps, as well as the Neumann KM-series.
The two microphones cross paths through the middle of the head with the diaphragm front-end at the ear entrance and the back-end with its connector at a hole opening behind the ear. Here, I made mic cables with right-angle XLR connectors so that the cable would immediately drop down from behind the ear and not stick out too much as would happen had I used regular straight connectors. (You can also buy XLR cables ready- made with right-angle connectors on either end).
Next, there is some EQ needed. The main reason is the strong resonance buildup caused by the largest concave shape of the pinna. This resonance is typically around 2.5 kHz. It's perfectly normal, but the problem arises when you play the dummy-head signals over loudspeakers (as well as many headphone types) where the 2.5 kHz area is boosted once during recording by the dummy-head ear, then an additional time by the listener's ear on the playback end. This resonance happens globally at any angle of sound direction so reducing its level won't affect the spatial cues. Using a mid-Q dip at 2.5 kHz of around 10 dB solves what would otherwise be an ugly, overbearing midrange peak. Other less important equalizing stages that I've found help make the overall frequency response more natural sounding include a slight HF shelf boost of only 2 or 3 dB above 5 kHz, and a narrow-Q boost near 8.8 kHz of around 5 or 6 dB.
On the playback end, the ideal situation with binaural encoding is when each ear hears only its corresponding signal; i.e., the listener's left ear is exposed only to the left side signal. Headphones can preserve this left/right separation, but — let's face it — typical stereo images reproduced over headphones are spatially challenged with sounds that are perceived at the center of your head, at either ear or perhaps stretched in-between those imaginary positions. Binaural recordings provide most headphoned listeners with the potential to perceive an externalizing of the sound images, and also to perceive sounds from behind and overhead. So over headphones the full possibility of binaural spatial effects can be appreciated — sort of like a surprise bonus feature on a CD.
Loudspeaker playback can still serve dummy-head recording well, but you should be aware that playing binaural recordings over loudspeakers would cause some crosstalk to reach each ear. Any (left or right) side signal would reach the intended ear as well as bend around the listener's head and reach the opposite ear. Sounds that were encoded from above, behind and to the sides would all be localized within the area covered between the loudspeakers. But despite this limitation of its full potential over loudspeakers, dummy-head recording easily rivals any standard stereo mic technique — and in some situations, can actually produce a much more striking spatial sound.
Binaural mics have long been widely used in outdoor environment recording, capturing the sounds of birdsongs, trains, ocean waves, etc. They are a good choice as room mics and for picking up background ambience, where they can give more of a continuous spread of sound as compared to many stereo mic techniques that might give more distinct clusters of images. Binaural-mic recording of audience sounds and reactions during a live performance can allow the listener at home to feel more involved and enveloped in the event than a recording with regular stereo or multiple mics. You could use it to sneak in an occasional extra sound effect into your mix (e.g. a quiet whisper into one ear, or some sudden sound from behind).
Using a binaural mic for vocals, subtly mixed with the usual close mono mic, can give a sense of real space and depth behind the singer. In this application, you'd probably want to keep the binaural mic linked with the close vocal mic when using compression unless you want the room to appear louder every time the compressor kicks down the close mic signal level.
Sonic advantages aside, the mere presence of a mannequin at a recording can add an eerie or fun atmosphere, which could work for you and the artists involved.
Using the binaural dummy-head microphone can open up a whole new world of stereo recording and headphone listening. Have fun experimenting!